In this article, we’ll walk-through the process of connecting to Salesforce Marketing Cloud (SFMC) using the SFMC Connector in Anypoint Studio. The SFMC connector provides two ways to connect; you can connect using Basic Authentication and with OAuth Client Credentials.
Tooling Versions
- Anypoint Studio 7.4.1
- Mule Server 4.2.2 EE
- Salesforce Marketing Cloud Connector 3.0.1
- Salesforce Marketing Cloud
A. Basic Authentication
1. Setup Salesforce Marketing Cloud
Before we can connect to Salesforce Marketing Cloud, we need to gather some properties and make sure Salesforce Marketing Cloud is setup correctly.
1.1. Login to Salesforce Marketing Cloud, click on drop-down in the top right of the screen, and click on Setup

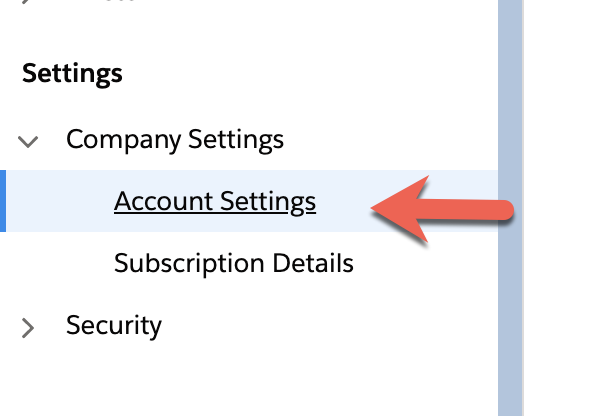
1.2 In the left-hand navigation bar, click on Settings > Company Settings > Account Settings
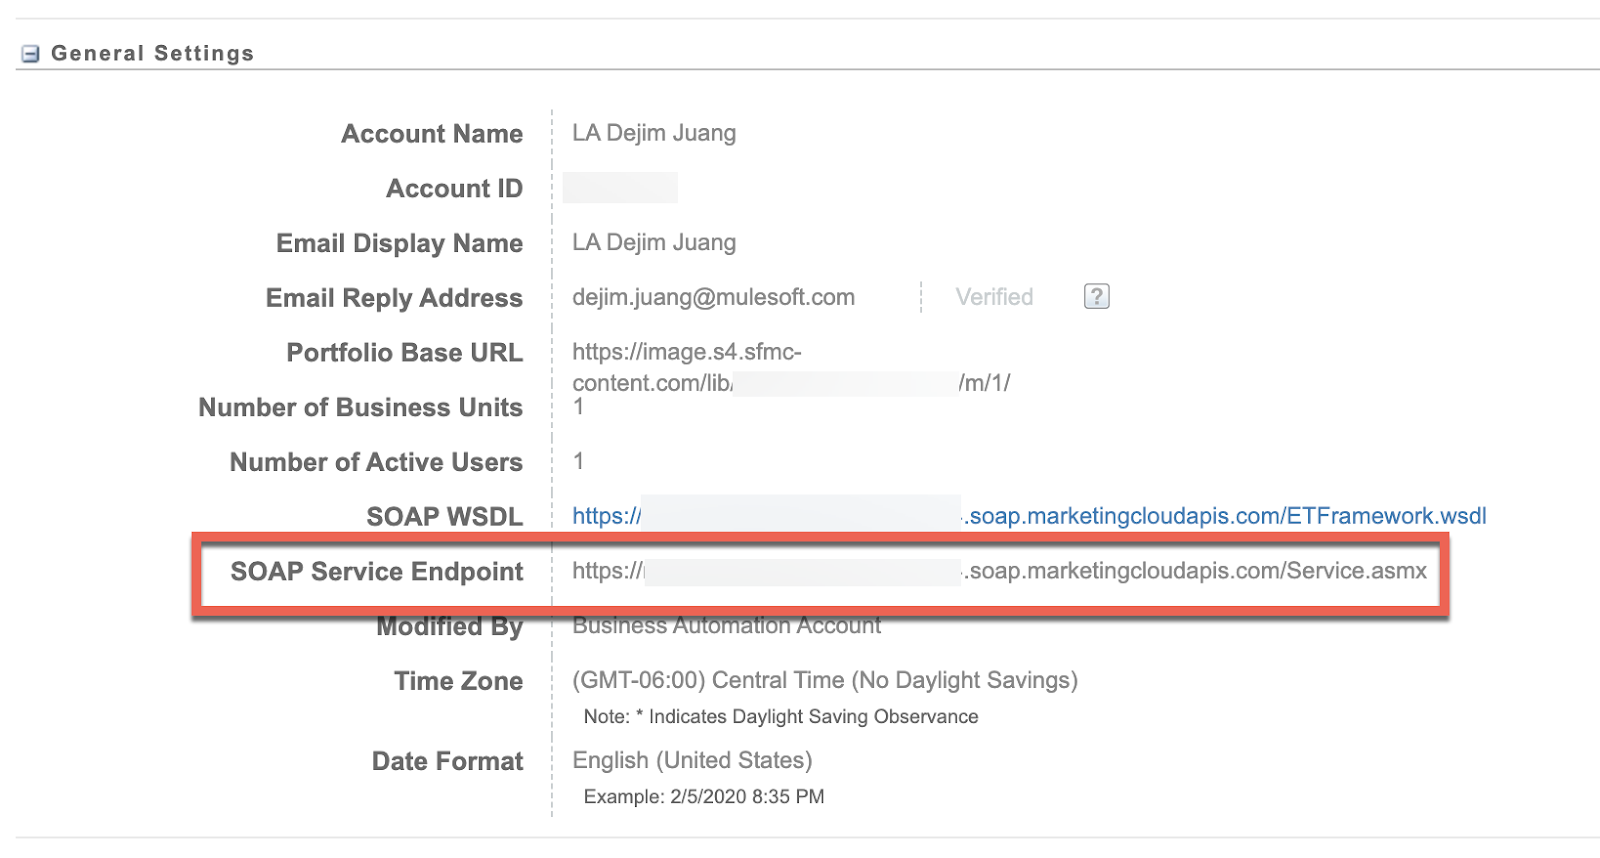
1.3 Under the General Settings section, copy down the SOAP Service Endpoint property. You’ll need this URL when you setup the connector in MuleSoft.
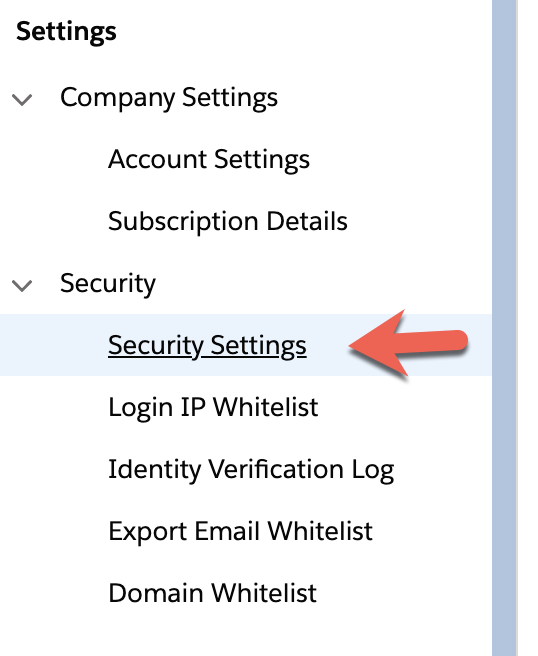
1.4 Next, we need to make sure the user can login with the connector using their username and password. By default this is set to No. In the left-hand navigation bar again, click on Settings > Security > Security Settings
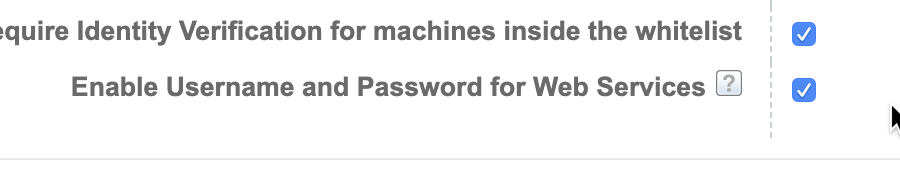
1.5 Find the Enable Username and Password for Web Services field under the Username and Logins section. If it is set to No, click on Edit. Otherwise, skip to Section 2.

1.6 Check the checkbox next to Enable Username and Password for Web Services
1.7 Click on Save

2. Setup Connection Configuration
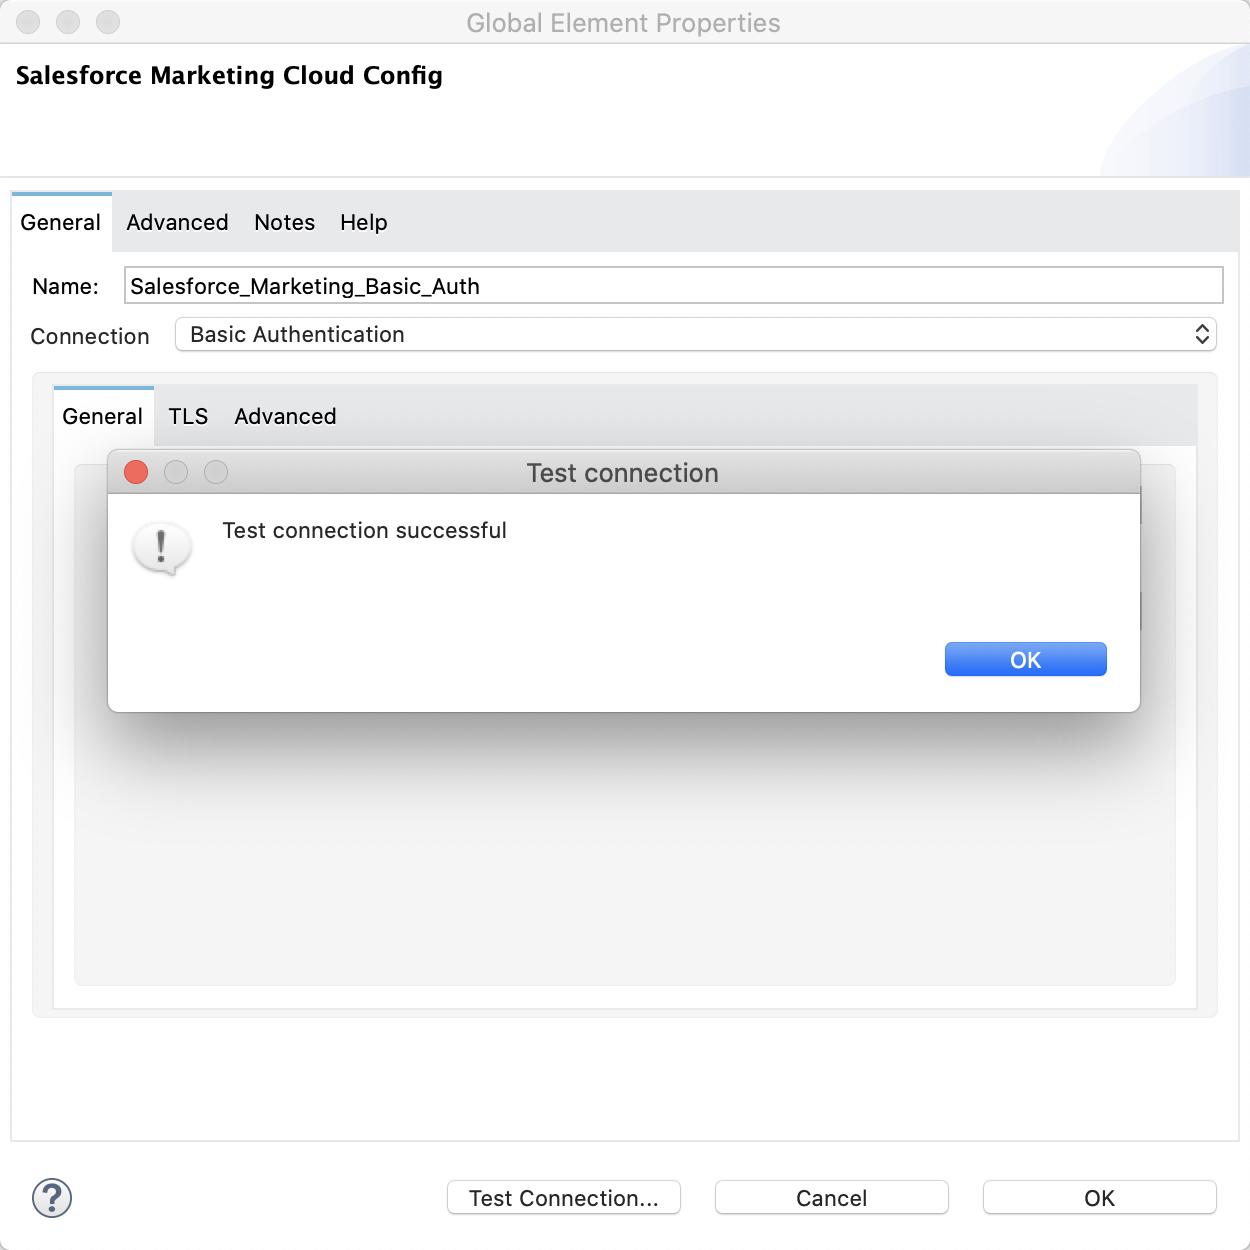
For the sake of keeping this article short, I’m not going to walk through the process of building out an entire flow. I’ll just show you how to configure the connection properties in order to see a successful connection test.
2.1 In your Anypoint Studio project, open the properties tab for a Salesforce Marketing Cloud connector operation and click on the green plus sign to add a new Connector configuration for the connector.

2.2 In the Global Element Properties window, configure the following fields:
- Connection: Select Basic Authentication
- General Tab:
- Username: Salesforce Marketing Cloud username
- Password: Salesforce Marketing Cloud password
- Service URL: URL that you copied down from Section A1 > 1.3
(e.g. https://<sub domain>.soap.marketingcloudapis.com/Service.asmx)

2.3 Click on Test Connection. If you’ve configured everything correctly, you should see the following window.
B. OAuth Client Credentials
1. Setup Salesforce Marketing Cloud
Instead of using a user account to connect, you can connect using OAuth Client Credentials. This section will walk you through the process of setting up an Installed Package to get the properties you need to setup the SFMC connector in MuleSoft.
1.1. Login to Salesforce Marketing Cloud, click on drop-down in the top right of the screen, and click on Setup
1.2 In the left-hand navigation bar, navigate to Platform Tools > Apps > Installed Packages

1.3 In the Installed Packages screen, click on New. Give the package a Name and Description and click on Save

1.4 Click on Add Component

1.5 Keep API Integration checked and click on Next

1.6 Select Server-to-Server and click on Next

1.7 Select the scopes that you want to make available to SFMC Connector to call and click on Save (e.g. Data > Data Extensions > Read and Write)

1.8 Back on the package details screen, copy down the following fields. We’ll need these to configure the SFMC Connector in MuleSoft.
- Client Id
- Client Secret
- Authenticate Base URI
- SOAP Base URI

2. Setup Connection Configuration
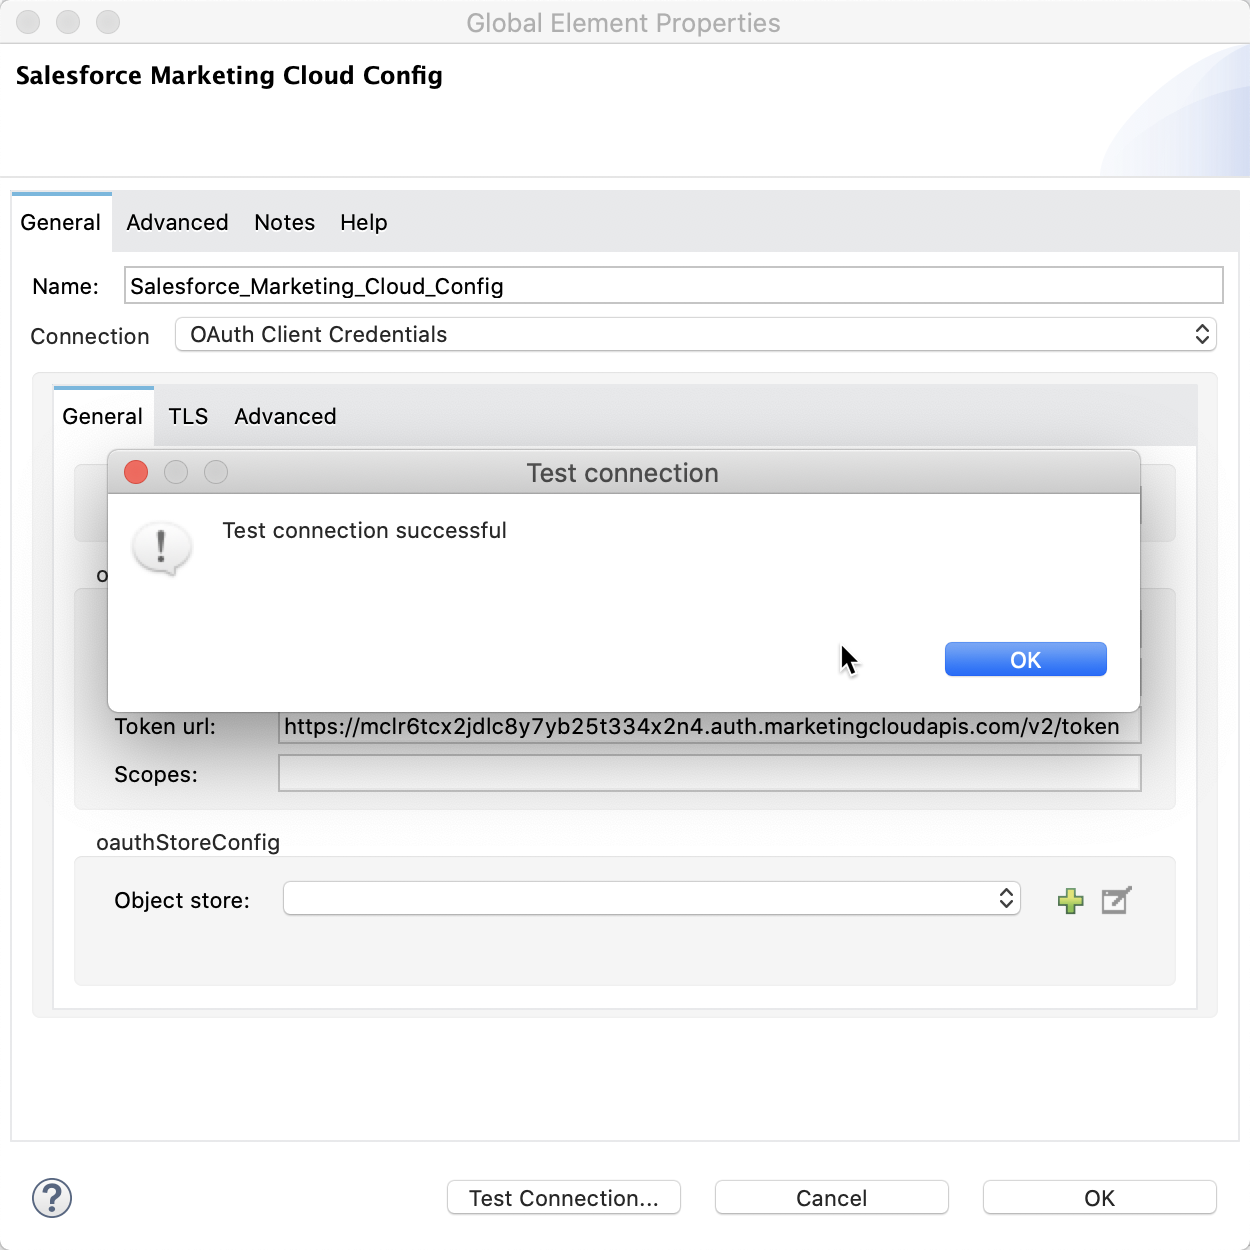
For the sake of keeping this article short, I’m not going to walk through the process of building out an entire flow. I’ll just show you how to configure the connection properties in order to see a successful connection test.
2.1 In your Anypoint Studio project, open the properties tab for a Salesforce Marketing Cloud connector operation and click on the green plus sign to add a new Connector configuration for the connector.
2.2 In the Global Element Properties window, configure the following fields:
- Connection: Select OAuth Client Credentials
- General Tab:
- Service URL: This the SOAP Base URI from Section B1 > 1.8. Be sure to add /Service.asmx to the end of the URL
(e.g. https://<sub domain>.soap.marketingcloudapis.com/Service.asmx)
- Service URL: This the SOAP Base URI from Section B1 > 1.8. Be sure to add /Service.asmx to the end of the URL

- Client Id: Client ID from Section B1 > 1.8
- Client Secret: Client Secret from Section B1 > 1.8
- Token URL: Replace the {domain} placeholder with the string from your Authenticate Base URI from Section B1 > 1.8. Be sure to keep the /v2/token at the end of the URL.


2.3 Click on Test Connection. If you’ve configured everything correctly, you should see the following window.
Summary
Hopefully this helps you get started with the MuleSoft Salesforce Marketing Cloud connector and how to get connected. In the next article, I’ll show you how to use the connector to upload data to Data Extension objects in a Mule project. If you run into any issues or have any questions, don’t hesitate to reach out to me.