
Overview
Salesforce Lightning Flow Builder is a process automation solution that provides a fast and easy tool to assemble flows. While Flows allow you to easily interact with Salesforce Objects, you can also make calls to Enhanced External Services from a flow. This article will walk you through the process of taking an API designed in MuleSoft, setting it up as an External Service, and calling that from Salesforce Lightning Flow Builder.
Enhanced External Services is a capability in Salesforce that takes an API with an OpenAPI 2.0 JSON schema, and generates Apex classes automatically for you. These Apex classes appear in Flow Builder as Apex actions. As another example of “Better together” with MuleSoft and Salesforce, you can take an API designed in API Designer in OpenAPI 2.0, or convert one built using RAML and convert it to OpenAPI 2.0 and bring that into Salesforce to be called in Flow Builder or in Apex code.
Steps
1. Get API schema from MuleSoft API Designer
- Login to Anypoint Platform
- Click on Discover & Share to open up Exchange

- Find and open the API that you would like to call from Flow Builder and open up the asset.

- Click on Download > OAS in the top right corner. One thing to point out is that if the API was designed in RAML, the link will say OAS Generated. If the API was designed with OpenAPI, it’ll just say OAS.

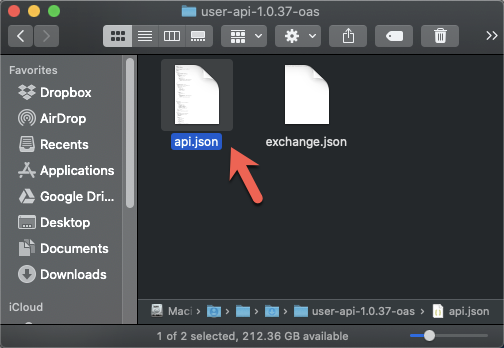
- Expand the downloaded *.zip file and open the api.json file with the OpenAPI 2.0 schema for your API. We’re going to need this in Step 3 when we paste the schema into the External Service that we’ll set up.
- If you don’t have an API, you can use the schema I’ve included below. I’ve included a copy below that will call an endpoint that I currently have setup and running. If the endpoint is down, just reach out through the comments below and I’ll see what I can do to bring the service back up:
{
 "swagger": "2.0",
 "info": {
   "title": "User API",
   "version": "1.0"
 },
 "host": "user-api-flow.us-e1.cloudhub.io/",
 "basePath": "/api",
 "schemes": [
   "https"
 ],
 "paths": {
   "/users": {
     "x-amf-displayName": "Users",
     "x-amf-description": "Get Users",
     "get": {
       "operationId": "get_users",
       "responses": {
         "400": {
           "description": ""
         },
         "200": {
           "description": "",
           "x-amf-mediaType": "application/json",
           "schema": {
             "description": "List of contacts",
             "example": [
               {
                 "id": "2",
                 "customerId": "2",
                 "firstName": "Joe",
                 "lastName": "Smith",
                 "phone": "312-555-1234",
                 "deptNumber": "1234",
                 "email": "jsmith@mule.soft"
               }
             ],
             "type": "array",
             "items": {
               "description": "Contact datatype",
               "type": "object",
               "additionalProperties": true,
               "required": [
                 "lastName"
               ],
               "properties": {
                 "id": {
                   "type": "string"
                 },
                 "customerId": {
                   "type": "string"
                 },
                 "firstName": {
                   "type": "string"
                 },
                 "lastName": {
                   "example": "Last name example",
                   "type": "string"
                 },
                 "phone": {
                   "type": "string"
                 },
                 "deptNumber": {
                   "type": "string"
                 },
                 "email": {
                   "example": "email@example.com",
                   "type": "string"
                 }
               }
             }
           }
         }
       }
     }
   },
   "/users/{id}": {
     "x-amf-displayName": "User",
     "x-amf-description": "Get User By Id",
     "get": {
       "operationId": "get_user_by_id",
       "parameters": [
         {
           "name": "id",
           "required": true,
           "in": "path",
           "type": "string"
         }
       ],
       "responses": {
         "400": {
           "description": ""
         },
         "200": {
           "description": "",
           "x-amf-mediaType": "application/json",
           "schema": {
             "description": "Contact datatype",
             "type": "object",
             "additionalProperties": true,
             "required": [
               "lastName"
             ],
             "properties": {
               "id": {
                 "type": "string"
               },
               "customerId": {
                 "type": "string"
               },
               "firstName": {
                 "type": "string"
               },
               "lastName": {
                 "example": "Last name example",
                 "type": "string"
               },
               "phone": {
                 "type": "string"
               },
               "deptNumber": {
                 "type": "string"
               },
               "email": {
                 "example": "email@example.com",
                 "type": "string"
               }
             }
           }
         }
       }
     }
   }
 }
}
2. Named Credentials
Before we can call the MuleSoft API from Flow, we need to set up the named credential which specifies the callout endpoint for the API and if needed the authentication parameters. For the sake of this post, we’re going to use an open API endpoint: https://user-api-flow.us-e1.cloudhub.io/console
- Login to Salesforce
- Navigate to Setup
- Search for Named and click on Named Credentials

- Click on New Named Credentials
- Fill in the following fields
- Label (e.g. User API)
- Name (e.g. User_API)
- URL (e.g. http://user-api-flow.us-e1.cloudhub.io)
- Uncheck Generate Authorization Header
- Click on Save


3. External Services
Once we set up the named credential, we can configure the external service that the Flow will be calling. We’ll need to have the OAS 2.0 JSON specification that we downloaded in Step 1.
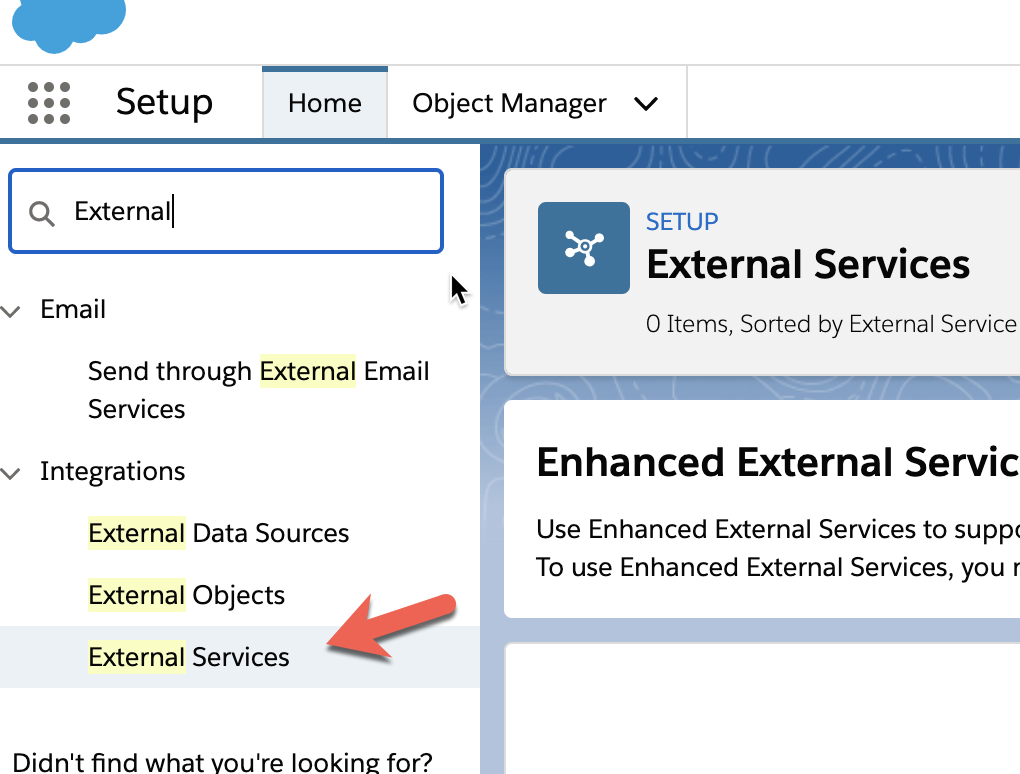
- In the Setup Quick Find, search for External and click on External Services
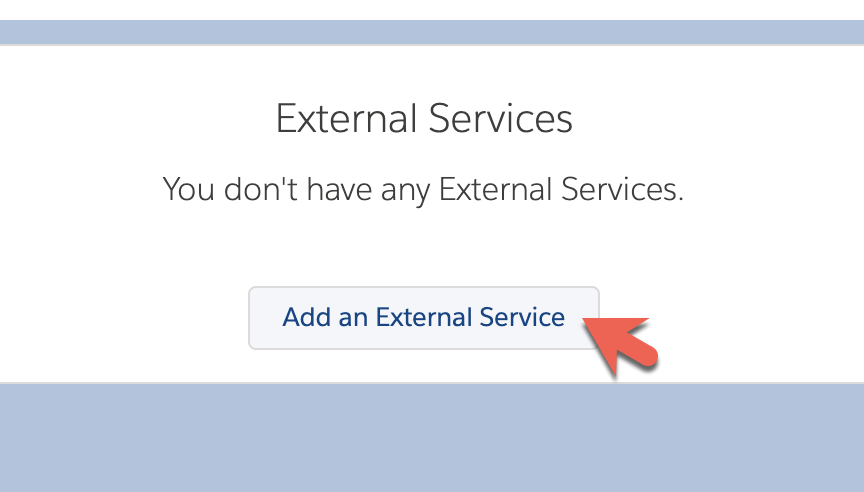
- Click on Add an External Service
- Fill in the following fields:
- External Service Name – no spaces or special characters are allowed (e.g. MuleSoftUserAPI)
- Select a Named Credential – select the Name Credential that we just created (e.g. User API)
- Description
- Click on the Service Schema Complete JSON radio button and paste in the OAS specification from above.
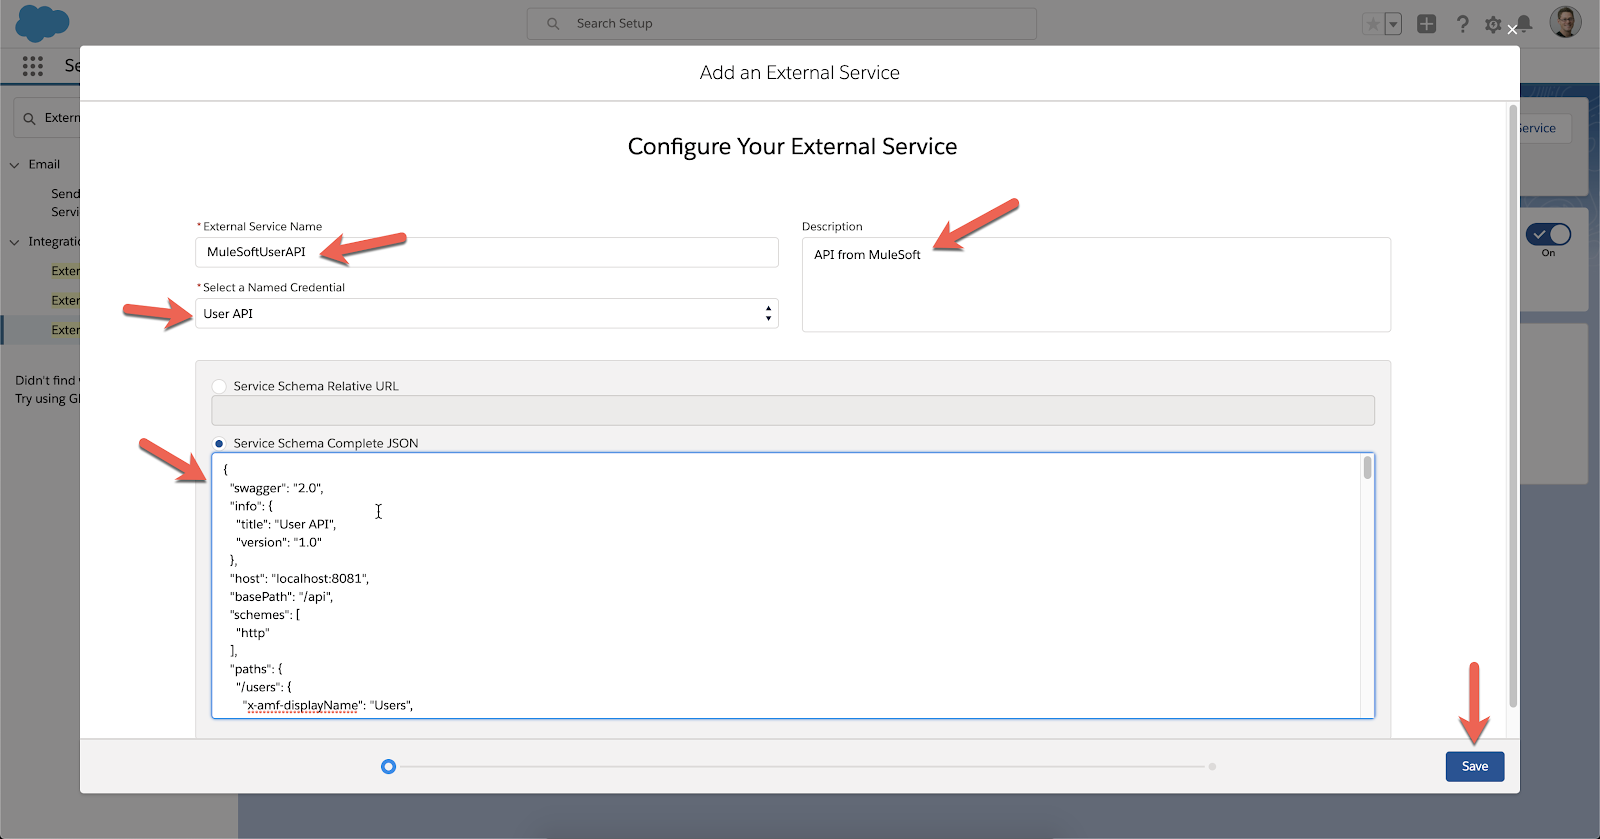
- Click on Save
- Verify the schema is correct in the next window and click on Done
NOTE: If you see the following error, you’ll need to modify your OpenAPI schema. External Service only supports references to definitions inline versus using “$ref”. |
4. Build Flow
Once we have the Named Credentials and the External Services set up, we can start to build the flow that will call the API.
- In the Setup Quick Find, search for Flow and click on Process Automation > Flows
- Click on New Flow
- For the Flow Type, click on Screen Flow and click on Create

- From the Toolbox, drag a Screen object to the canvas.

- Fill in the Label field with Enter User ID and hit tab and click on Done.

- From the Screen Components, drag and Input > Text into the canvas.
- Give the field a Label (e.g. Input User ID) and hit tab, then click the Require checkbox. For the Default Value field, type in 103 and then click on Done.

- Next, from the Toolbox, drag Interaction > Action into the canvas.

- In the Search All actions… field, type in User and select Get User By ID

- Fill in the Label field (e.g. Get User), hit tab, and then click the switch to Include so the Enter value or search resources…
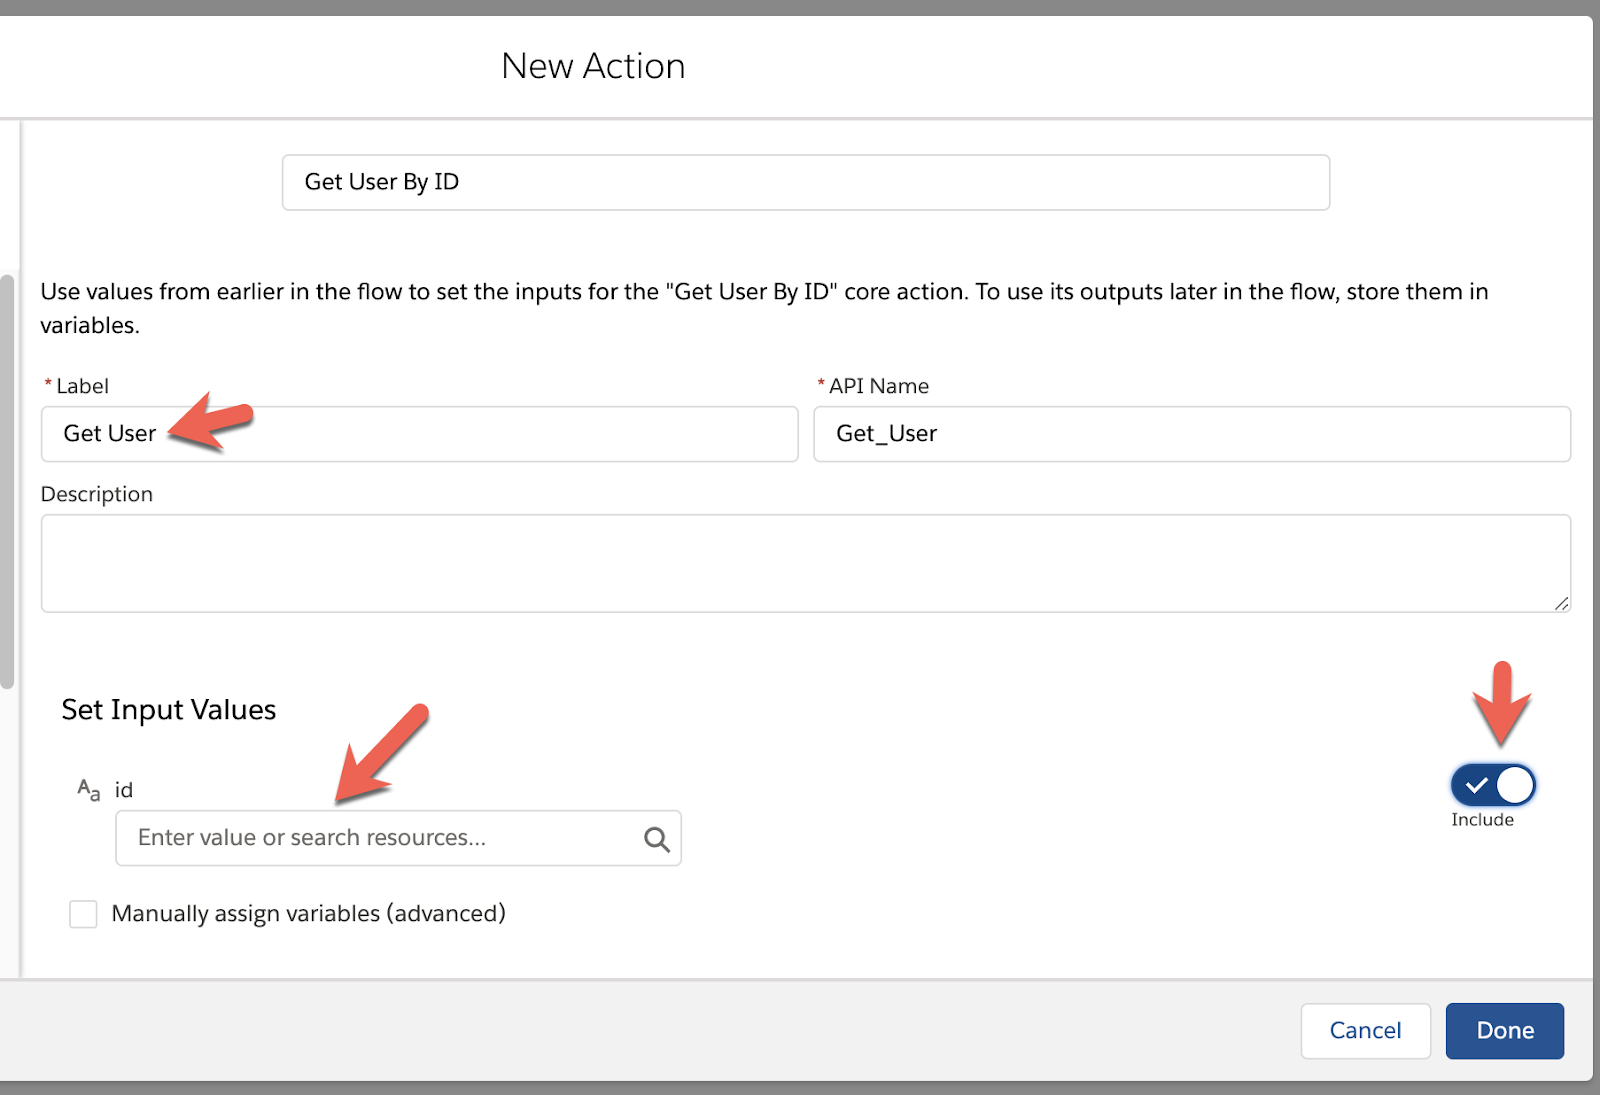
- Select the Enter value or search resources… field and click on Input_User_ID. This is the variable that stores the value from the input field from the Screen component.

- Click on Done
- Drag another Screen component into the canvas.
- Fill in the Label field with Display User and hit tab and click on Done.
- From the Screen Components, drag and Display > Text into the canvas.

- Give the Display Text and API Name (e.g. UserInfo) and then click on Insert a resource… and select Outputs from Get_User
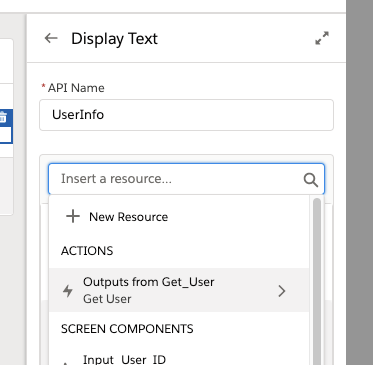
- Click on 200
- Click on firstName. As you can see, Salesforce parses the OpenAPI schema and generates the Apex classes to provide the metadata around the API.

- Repeat this for lastName and click on Done
- Back on the canvas, connect all the components by clicking on the dot and dragging the line to the next component so it looks like the following:

- Click on Save
- In the Save Flow window, type in a value into the Flow Label field (e.g. Show Users), hit tab, and click on Save

5. Test Flow
- Click on Run

- You can change the User ID value to another number or click on Next
- If everything was configured successfully, you should see the name of the user from the database being displayed.

Summary
As you can see, calling an API designed in MuleSoft from Salesforce Flow Builder is a simple process. Salesforce makes it easier by automatically generating the Apex classes and actions around the API. With this generated code, you can easily call external services outside of Salesforce to insert, update, or retrieve data to help a user as they walk through a flow.
Leave a Reply