Continuous Integration (CI) is a DevOps development practice that requires developers to check code into a shared repository (e.g. Github) after which automated builds and tests are run. This process allows teams to detect problems early and locate them more easily.
The MuleSoft Anypoint Platform provides the flexibility and tools to easily build a CI process into your API Lifecycle or tie into an existing CI process using common tooling like Jenkins, Maven, TeamCity, etc…
The mule-maven-plugin is a tool that we provide that allows you to deploy Mule applications to different kinds of Mule Runtime servers: Standalone (both Community and Enterprise), Clustered, and CloudHub.
Recently I had to figure out how to deploy a Mule Domain project to a standalone Mule Runtime. I documented the process below.
My environment consisted of the following components all running locally on my Macbook.
- Mule Runtime 3.8.3
- Anypoint Studio
- Maven 3.3.9
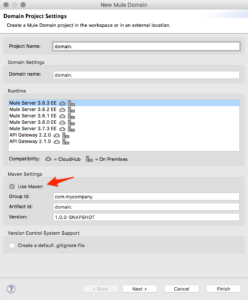
In Studio, I created a ‘Mule Domain Project’. Be sure to check the Use Maven checkbox when you create the project. Also set the ‘Project Name’ as domain. This is important for the deployment to work for this particular exercise. I’ll go into detail why later.
In the domain, I just created an HTTP listener on port 8082 that would be shared by projects in the domain.
<?xml version="1.0" encoding="UTF-8"?>
<domain:mule-domain
        xmlns="http://www.mulesoft.org/schema/mule/core"
        xmlns:domain="http://www.mulesoft.org/schema/mule/ee/domain"
        xmlns:xsi="http://www.w3.org/2001/XMLSchema-instance"
        xmlns:spring="http://www.springframework.org/schema/beans"
        xmlns:doc="http://www.mulesoft.org/schema/mule/documentation"
        xmlns:http="http://www.mulesoft.org/schema/mule/http"
        xsi:schemaLocation="http://www.mulesoft.org/schema/mule/core http://www.mulesoft.org/schema/mule/core/current/mule.xsd
http://www.mulesoft.org/schema/mule/http http://www.mulesoft.org/schema/mule/http/current/mule-http.xsd
http://www.springframework.org/schema/beans http://www.springframework.org/schema/beans/spring-beans-current.xsd
http://www.mulesoft.org/schema/mule/ee/domain http://www.mulesoft.org/schema/mule/ee/domain/current/mule-domain-ee.xsd">

    <http:listener-config name="HTTP_Listener_api_8082" host="0.0.0.0" port="8082" doc:name="HTTP Listener Configuration"/>

</domain:mule-domain>
Next, I created a really simple ‘Hello World!’ project as part of the domain. Again, be sure the check the Use Maven checkbox when you create the project. The flow uses the shared HTTP listener resource as you can see in the code below.
<?xml version="1.0" encoding="UTF-8"?>

<mule xmlns:http="http://www.mulesoft.org/schema/mule/http" xmlns="http://www.mulesoft.org/schema/mule/core" xmlns:doc="http://www.mulesoft.org/schema/mule/documentation"
	xmlns:spring="http://www.springframework.org/schema/beans"
	xmlns:xsi="http://www.w3.org/2001/XMLSchema-instance"
	xsi:schemaLocation="http://www.springframework.org/schema/beans http://www.springframework.org/schema/beans/spring-beans-current.xsd
http://www.mulesoft.org/schema/mule/core http://www.mulesoft.org/schema/mule/core/current/mule.xsd
http://www.mulesoft.org/schema/mule/http http://www.mulesoft.org/schema/mule/http/current/mule-http.xsd">
    <flow name="test-mavenFlow">
        <http:listener config-ref="HTTP_Listener_api_8082" path="/" doc:name="HTTP"/>
        <set-payload value="Hello World!" doc:name="Set Payload"/>
    </flow>
</mule>
For Maven to compile and deploy the project, we need to modify the pom.xml file and add the plugin.

You can use the code below. There are three configurations that are required for this to work.
- <deploymentType> – This ensures that the project is deployed to a standalone Mule Runtime
- <muleHome> – Setting this to the base directory of your Mule Runtime ensures that Maven doesn’t download and install a Mule standalone server.
- <domain> – This is the location of the mule-domain-config.xml file. The plugin uses the name of the folder that the file sits in when it creates the domain on the Runtime server. This name needs to match the domain that the Mule projects are tied to. For this article, I created a domain called domain so I wouldn’t have to move the mule-domain-config.xml to a different folder that matched the Mule project.
<plugin>
    <groupId>org.mule.tools.maven</groupId>
    <artifactId>mule-maven-plugin</artifactId>
    <version>2.1.1</version>
    <configuration>
        <deploymentType>standalone</deploymentType>
        <muleHome>/Users/dejimjuang/MuleSoft/mule-enterprise-standalone-3.8.3</muleHome>
        <domain>/Users/dejimjuang/Workspace/maven-test/domain/src/main/domain</domain>
    </configuration>
    <executions>
        <execution>
            <id>deploy</id>
            <phase>deploy</phase>
            <goals>
                <goal>deploy</goal>
            </goals>
        </execution>
    </executions>
</plugin>
Once everything is setup, you can execute the deployment by running the following command:
mvn package mule:deploy -DskipMunitTests
If configured successfully, Maven will create a domain and compile and deploy the Mule project to the apps folder. If the Mule Runtime is stopped, it will start it as well.
Hopefully you’re successful in setting this project up. Leave a comment if you run into any issues or have any questions. Good Luck!