This is the part 2 in a 3-part series on how to connect to Salesforce Marketing Cloud (SFMC) using MuleSoft.
In the first part, I walked you through the process of setting up the connection between MuleSoft and SFMC. You can use the MuleSoft SFMC connector to connect using either Basic Authentication or with OAuth Client Credentials.
In this post, this will take what you learned and built and walk you through the process of uploading data to Data Extensions in Contact Builder.
Tooling Versions
- Anypoint Studio 7.5.0
- Mule Server 4.3.0 EE
- HTTP Connector 1.5.18
- Salesforce Marketing Cloud Connector 3.0.4
- Salesforce Marketing Cloud
- Postman
1. Setup Salesforce Marketing Cloud
Create Data Extension
If you already have a Data Extension that you would like to use, you can skip this section. Just be sure to grab the External Key for the object. Otherwise, follow along to learn more about how to set one up in SFMC.
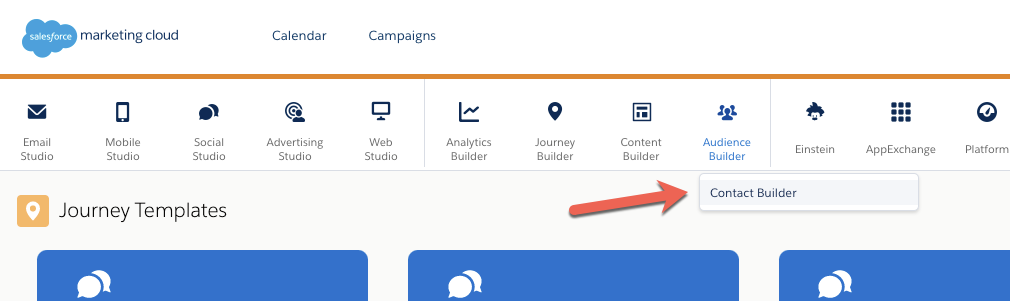
1. Login to Salesforce Marketing Cloud, and click on Audient Builder > Contact Builder
2. In Contact Builder, click on Data Extensions

3. In the top-right corner, click on Create

1.3 In the Create New Data Extension window, give the Data Extension a name (e.g. ExtraData) and then click on Next

4. Keep the default settings on the Data Retention Policy screen and click on Next

5. In the Attributes screen, create the following 3 attributes and then click on Complete
- FirstName – keep the Data Type as Text
- LastName – keep the Data Type as Text
- Id – Change the Data Type to Number and check the Primary Key checkbox.

6. Once the Data Extension is created, you’ll see the newly created object in the list. Click on the name to drill into the details.

7. Copy down the External Key. You’ll need this in the next step in order to write data to the correct Data Extension

2. Setup MuleSoft
Create/Configure Mule Flow
Now that you have a Data Extension created, we can use MuleSoft to write data to the object. Assuming you’ve already completed Part 1, we’ll take the configuration and create a Mule flow that will insert data into the Data Extension in SFMC.
1. Switch to Anypoint Studio, and open the project that you created in Part 1. You should have the following components in your Mule Palette already.

2. Drag and drop the components to make the following flow. We’ll walk through configuring each component next.

HTTP Listener
3. For the HTTP Listener, change the Display Name and Path field. I generally set them to be the same in order to make it easier to understand how to call the flow from the browser later. For the purpose of this article, I set the Path to /create. Next click on the green plus sign to create the HTTP Listener configuration.

4. Leave all the settings to their default values and click on OK

Salesforce Marketing Cloud – Create Entities
To make it easier to understand the DataWeave scripts in the Transform Message components, we’ll configure the SFMC Connector first. Assuming you came from Part 1 of this 3-part series, you’ve already configured the connection configuration.
5. In the General section, set the Object type to DataExtensionObject. Leave the Api objects and Create options with their default values.

Transform Message – Before
6. Paste the following DataWeave script into the script editor of the first Transform Message component before the SFMC connector.
%dw 2.0
output application/java
---
[{
	CustomerKey: "5A93F412-7929-4E8C-9E43-6698548A5E2B",
	Properties: {
		Property: [{
			Name: "FirstName",
			Value: payload.FirstName
		},{
			Name: "LastName",
			Value: payload.LastName
		},{
			Name: "ID",
			Value: payload.ID as String
		}]
	}
}]
Notice the CustomerKey highlighted in red. Replace that with the External Key that you copied down in Section 1, Step 7

Transform Message – After
7. Paste the following DataWeave script into the script editor of the second Transform Message component after the SFMC connector. We’re essentially going to convert the output from the operation to JSON and return that back to the browser.
%dw 2.0
output application/json
---
payload

3. Run Application
Let’s test out the application and see it work. We’re going to use Postman and run a GET request against the endpoint and pass a JSON structure in the body.
1. First we need to start the application. Right-click on the canvas and select Run project

2. Once the Console says the app has been deployed successfully, switch to Postman

3. In Postman, set the Request URL to http://localhost:8081/create
4. Click on the Body tab, check the Raw radio button, and set the type dropdown to JSON
5. In the Body field, paste the following JSON payload:
{
    "FirstName": "Joe",
    "LastName": "Smith",
    "ID": 1
}

6. Click on Send
7. If everything was configured successfully, you should get a 200 OK HTTP status and the response should have OK for the statusCode

8. Switch over to Salesforce Marketing Cloud and navigate to the details page of the Data Extension that we created in Section 1. Click on Records

9. This screen just verifies that the data was passed in from Postman successfully.

Summary
As you can see, MuleSoft and Salesforce Marketing Cloud are better together. With the pre-built SFMC connector, users can easily tie in data from any source. Data can be orchestrated from multiple sources or enriched and cleansed without having to write any custom code.
In the next part of the series, I’ll walk you through the process of connecting to Salesforce Marketing Cloud (SFMC) using the MuleSoft HTTP connector in Anypoint Studio. I’m sure you’re asking “why?” if you can already connect using the pre-built connector.
The reason is that the SFMC connector only wraps the SOAP APIs. In addition to the SOAP APIs, SFMC has a set of REST APIs that provide some additional capabilities that aren’t found in the SOAP APIs. Stay tuned for the next post. If you have any questions or run into any issues with the steps in this article, don’t hesitate to leave a comment below.