This is the last in a 3-part series on how to connect to Salesforce Marketing Cloud (SFMC) using MuleSoft. In the previous articles, I showed you how to set up the connection configuration of the SFMC connector as well as how to push data to Data Extensions with the SFMC connector.
In this article, I’ll walk you through the process of connecting to Salesforce Marketing Cloud (SFMC) using the MuleSoft HTTP connector in Anypoint Studio. If you’re wondering why a user would use the HTTP connector versus the pre-built connector, the reason is that the pre-built connector only wraps the SOAP APIs. In addition to the SOAP APIs, SFMC has a set of REST APIs that provide some additional capabilities that aren’t found in the SOAP APIs.
Tool Versions
- Anypoint Studio 7.5.1
- Mule Server 4.3.0 EE
- HTTP Connector 1.5.19
- Salesforce Marketing Cloud Connector 3.0.4
- Salesforce Marketing Cloud
- Postman (for testing)
A. Create Mule Flow
Setup Properties File
To make this project easier, we’re going to build off the project from the previous 2 parts of this series. You can use the same settings and configurations from the Installed Package that we created in Part 1.
- In the Package Explorer, right click on the src/main/resources folder and click on New
- Give the file a name (e.g. mule-properties.yaml) and click on Finish
- Paste the properties in the table below into the file and fill in the fields with the corresponding properties for your Salesforce Marketing Cloud instance. These can be found in Part 1 of the series in Section B – OAuth Client Credentials.
The sfmc.data_extension.external_key property should correspond to the Data Extension that we created in Part 2 of the series. In the Mule flow, we’ll be calling the REST API that uploads data into Data Extensions.
sfmc:
  client_id: "<client id>"
  client_secret: "<client secret>"
  token_url: "https://<subdomain>.auth.marketingcloudapis.com/v2/token"
  subdomain: "<subdomain>"
  account_id: "<account id>"
  data_extension:
    external_key: "<external key>"
- Click on Global Elements

- Click on Create
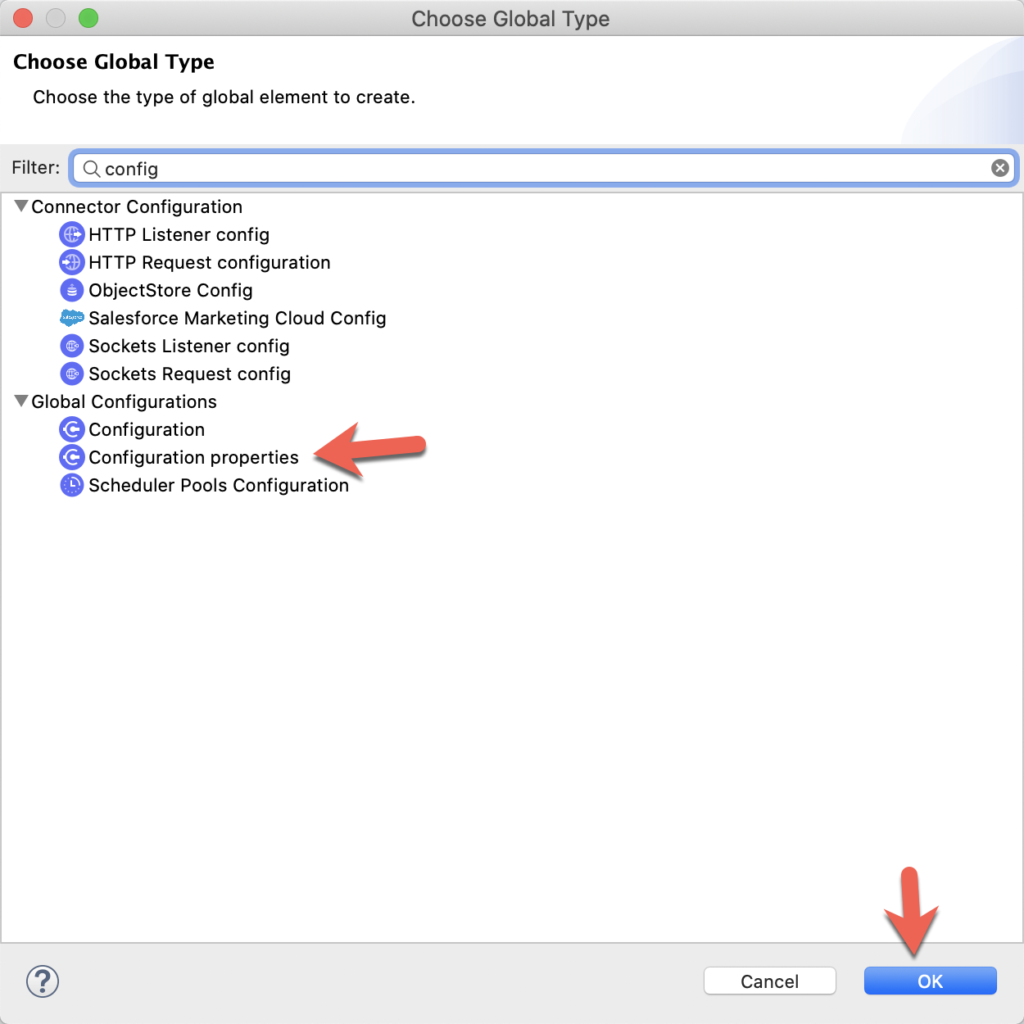
- Search for config using the Filter
- Click on Configuration properties and click on OK

- Click on the File Browse button and point it to the properties file we just created (e.g. mule-properties.yaml) and click OK

Create/Configure Mule Flow
Now that we’ve defined the properties file, let’s build the following flow. I’ll walk you through the configuration of each component below.
HTTP Listener
- Because we’re building off the previous project, we don’t need to setup the connector configuration. We just need to set the path.
- I also like to set the Display Name field to the same value as the path so I know how to call the flow when I run the application.
Set Variable
- We need to store the incoming payload into a variable because we’re going to be making an HTTP Request and we don’t want to lose original data. Set the Name to data and the Value to payload
Cache Scope
- The Cache Scope is needed to store the access token so we don’t need to make a request each time we call the flow
- Before we start, make sure you have the Object Store component in your Mule Palette
- Click on Global Elements and then click on Create
- Search for object in the Filter field and select Object store
- Set the Name to accessToken, set Max entries to 1, Entry ttl to 5, and Expiration interval to 1, and then click on OK
- Click on Create again and search for caching and select Caching Strategy
- In the Caching Strategy
- Set the Name (e.g. Caching_Strategy_Access_Token)
- Change the Reference > Object Store to Global reference
- Set Global reference to accessToken
- Under the Event Key section, click on the Key Expression radio button and fill in the field with access_token
- Click on OK
- Switch back to Message Flow and select the Cache Scope
- In the properties tab, select the Reference to a strategy radio button and select the strategy we just created (e.g. Caching_Strategy_Access_Token)
HTTP Request – Get Access Token
- Click on the HTTP Request to open the Mule properties tab
- Click on the green plus sign to add a new configuration for the request.
- In the HTTP Request configuration window:
- Set the Name (e.g. HTTP_Request_SFMC_Request_Token)
- Change the Protocol to HTTPS
- In the Host field, this is the Authentication Base URI that you grabbed in Part 1, Step 1.8. If you login back into SFMC, you can find it under Setup > Platform Tools > Apps > Installed Packages > <Package Name>. The URI ends with .auth.marketingcloudapis.com (e.g. <sub domain>.auth.marketingcloudapis.com)
- Click on OK
- Back on the Mule properties tab, under the Request section, change the Method to POST
- Set the Path to /v2/token
- In the Body tab, paste the following DataWeave script
output application/json
---
{
    "grant_type": "client_credentials",
    "client_id": p('sfmc.client_id') ,
    "client_secret": p('sfmc.client_secret'),
    "account_id": p('sfmc.account_id')
}
- Click on Headers and add the following Name/Values
- Name: “Accept” and Value: “*/*”
- Name: “Content-Type” and Value: “application/json”
HTTP Request – SFMC REST Call
For the purpose of this post, we’ll be calling the Data Events endpoint which upserts multiple data extension rows in a single synchronous call.
- Click on the HTTP Request to open the Mule properties tab
- Click on the green plus sign to add a new configuration for the request.
- In the HTTP Request configuration window:
- Set the Name (e.g. HTTP_Request_SFMC_REST)
- Change the Protocol to HTTPS
- In the Host field, this is the REST Base URI from Part 1, Section B, Step 1.8. If you login back into SFMC, you can find it under Setup > Platform Tools > Apps > Installed Packages > <Package Name>. The URI ends with .rest.marketingcloudapis.com (e.g. <sub domain>.rest.marketingcloudapis.com)
- Click on OK
- Back on the Mule properties tab, under the Request section, change the Method to POST
- Set the Path to the following DataWeave script
"/hub/v1/dataevents/key:" ++ p('sfmc.data_extension.external_key') ++ "/rowset"
- In the Body tab, paste the following DataWeave script. We’re going to pass the variable that holds the original payload that was passed into the listener.
vars.data
- Click on Headers and paste in the following DataWeave script. This will pass in the access token from the previous HTTP Request and set the Content-Type.
output application/java
---
{
	"Authorization" : "Bearer " ++ payload.access_token ,
	"Content-Type" : "application/json"
}
Transform Message
- We’re going to just output the response in JSON format so in the DataWeave, just past the following
%dw 2.0
output application/json
---
payload
B. Test Flow in Postman
- Right click on the canvas and select Run project <project name>
- When the project is deployed, switch to Postman
- Change the method to POST and set the Request URL to http://localhost:8081/create-bulk
- Click on Body
- Select the raw radio button
- Change the drop-down to JSON
- Paste the following into the body:
[
  {
      "keys": {
          "ID": "75"
      },
      "values": {
          "FirstName": "Billy",
          "LastName": "Thompson"
      }
  },
  {
      "keys": {
          "ID": "37"
      },
      "values": {
          "FirstName": "Sarah",
          "LastName": "Zhang"
      }
  }
]
- Click on Send
- If everything was configured correctly, you should get a 200 OK status back and the response body will be the body that you initially passed in during the request.
- Additionally, if you switch back to Salesforce Marketing Cloud, you’ll see the data under the Data Extension object.
Summary
We’ve covered quite a bit throughout this three part on connecting with Salesforce Marketing Cloud using MuleSoft. I’ve walked you through the process of setting up the SFMC Connector in MuleSoft using either Basic Authentication or OAuth Client Authentication (Part 1). I’ve shown you how to use the Salesforce Marketing Cloud Connector, which wraps the SOAP APIs, in a MuleSoft flow (Part 2). And lastly, I’ve shown you how to call the Salesforce Marketing Cloud REST APIs using the HTTP Connector.
With this knowledge, you should be able to transform any data between Salesforce Marketing Cloud and any system or application easily with the Anypoint Platform. If you run into any problems, or have any feedback, don’t hesitate to leave a comment below.


Leave a Reply